
FREQUENTLY ASKED QUESTIONS (FAQ)
Browse questions below that we are frequently asked. Hopefully you will find the answers you are looking for. If not, don't hesitate to reach out to us.
How do I clean my clam gun?
Murff’s Claminator™ products are fine tools and should be treated with the care that any quality tool requires. These products are made to extremely high standards of quality. Properly taken care of, they should provide years (even generations) of use. Although saltwater and sand is a highly corrosive combination, rinsing your Murff's Claminator products thoroughly with fresh water after use will reduce the chance of the stainless steel becoming rusted or pitted. The valve and vent tube should also be rinsed thoroughly with fresh water after every use and should be free of sand or other debris before storing. Listen for the rattle of the valve bolt! If it rattles, its working properly!
The valve on my clam gun is stuck closed
First off, There is a wide range of sand consistencies. Drier sand tends to adversely affect the valve action efficiency. To prevent your clam gun valve from getting stuck or clogging up with sand you should frequently (every hole or two) rinse the valve in the surf or a tide pool and give it an occasional little twist/shake to let the valve rattle around. This will help to keep the vent tube clear and prevent it from clogging up.
You may occasionally find that the valve is stuck in the closed position. (This is quite easy to determine because it means the vent tube will not be working and the clam gun will be much harder to pull a core out of the sand). Try rinsing the valve in the surf or a tide pool. If that doesn’t work to free the valve, try laying the clam gun down, horizontally in the surf or a side pool, allowing water to enter the top of the vent tube to “flush” the valve clean. Again, give the gun a little twist/shake and listen for the rattle, insuring the valve is operating correctly.
If the above methods do not work to free the valve, the next step is to carefully pry the valve open. Sometimes this can be accomplished with just a fingernail. You can also use a small flat-head screw driver or pocket knife to gently pry it open. Once free, rinse thoroughly in the surf or a tide pool to clean out any remaining sand.
Upon inspection of a few guns returned due to claims of valve defect. I have found most of them had dried sand in the vent tube and with a rinse and a few taps, it freed the sand and the gun was completely operable.
CAUTION: Although the valve has a Phillips (cross) head, it is not designed to be twisted or unscrewed. By doing so, you risk breaking off the rivet that is holding it in place.
My clam gun valve keeps getting stuck!
We have confirmed a degree of success in preventing the problem of occasional vent tube sticking or getting jammed when digging primarily in dryer sand.
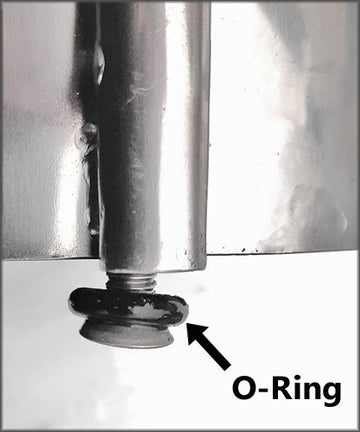
Try this: Carefully stretch a small, rubber O-ring over the bottom of the valve at the bottom of the vent tube. (I used a #31 plumbing o ring 1/8” thick, x 9/16” o.d. x 5/16” i.d.) which is available at most hardware stores for under $1 ea. Certainly an easy and cheap thing to try if you are having trouble with your valve sticking closed!
Any similar size O-ring should be effective in helping with this.
We thank an out-of-the-box-thinking customer for trying and recommending this solution!
If you continue to experience issues with your valve clogging or being stuck, and you are regularly rinsing your gun to keep it clear, it may be because the valve is fitting too tightly within the vent tube. This is a rare complaint, but we do hear it occasionally.
I have had feedback from some customers that ever-so-slightly “crimping” the bottom of the vent tube with a pair of pliers to achieve a very, very slight oblong shape (so the screw cannot seat completely in the tube), will help prevent the valve from sticking closed.
CAUTION: If you decide to try this last method, use extreme caution when crimping. Over crimping could cause an issue that could void the warranty and render the vent tube unrepairable.
How do I remove rust on my stainless steel clam gun?
If you forgot or were unable to properly clean your clam gun after using it in salt water you may find some rust on your gun. Surface rust is a result of not rinsing the gun with fresh water and is only cosmetic. It is easily removed my hand polishing with a fine grit, “maroon” Scotch-Brite™ pad. Blending can be achieved by polishing in a particular direction (creating a grain) and lightly going over the entire gun! you can also use a stainless cleaner if its going to be stored for a long period of time!
How should I prepare my clam gun for storage?
It is critical to insure your gun should be thoroughly cleaned before storing it for any length of time. I suggest reverse flushing the vent tube from the top end, before putting away until the next dig. Never oil or lubricate the “valve” with anything other than water.
How do I make your own PVC tamper?
Click on the button below to visit our tamper page for a complete list of parts and instructions on how to build your own PVC tamper.

Other Questions?
Did we not answer your question? Please feel to contact us with any questions regarding your Murff’s Claminator™ products via our contact from on the home page. We will do our best to get back to you as soon as possible.